Integrating with an Identity provider (here) allows you to Synchronize Users and Groups. If you want to require that your users sign-in with their credentials, including your organization’s required MFA steps, you can do so for MS Entra and Okta by following the steps below.
Once configured, any user signing into your XQ team will be required to sign-in with their organizational identity credentials,
Microsoft Entra
Overview
Setting up Entra ID integration requires your team to authenticate using their Microsoft accounts, providing a seamless and secure login experience. The process involves registering an application in Azure, configuring permissions, and connecting it to XQ.
Estimated setup time: 10-15 minutes
Before You Begin
To complete this setup, you’ll need:
- Administrator access to your Azure portal
- Access to the XQ Management Portal
- Your organization’s Tenant ID (we’ll show you where to find this)
Setting Up Entra ID Integration
Follow these steps to configure Entra ID as your identity provider for XQ.
- Navigate to the Azure Portal
- Go to https://portal.azure.com and sign in with your administrator credentials.
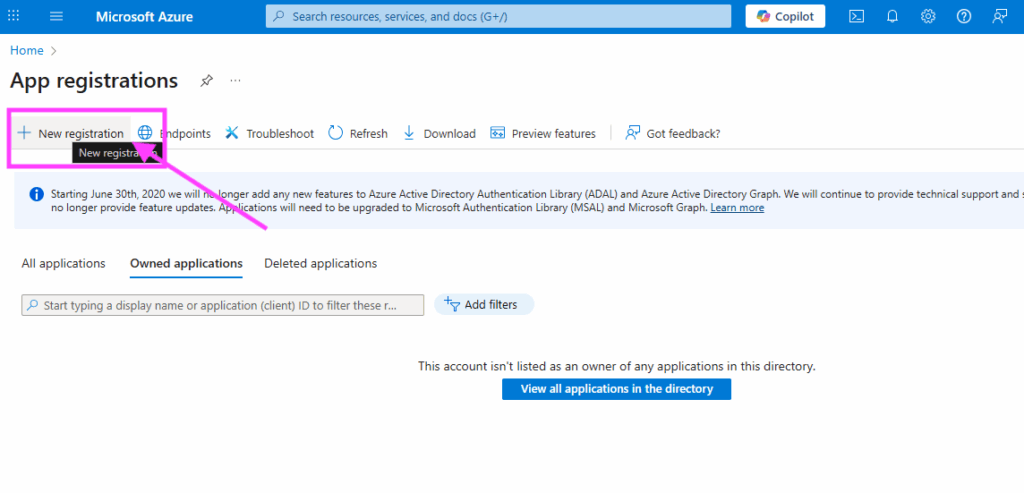
- Open App Registrations
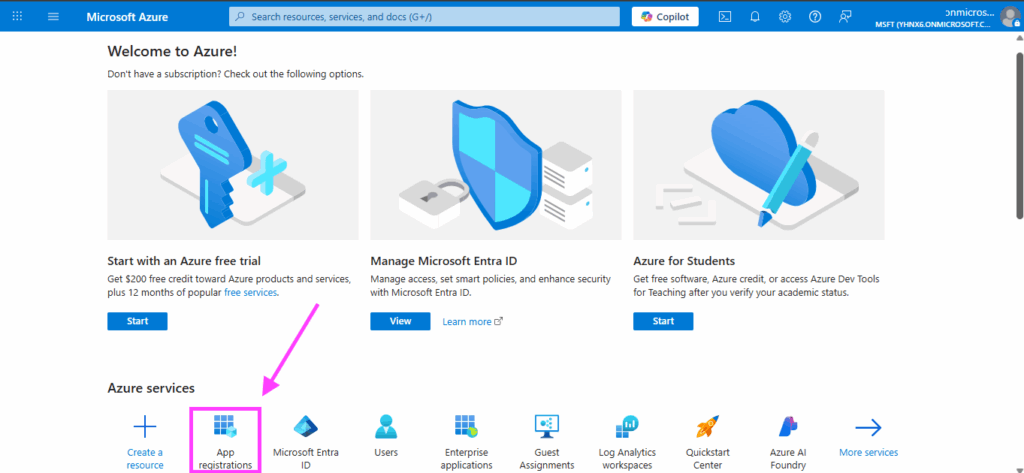
- Create a New Registration
- Click the + New Registration link at the top left of the page.
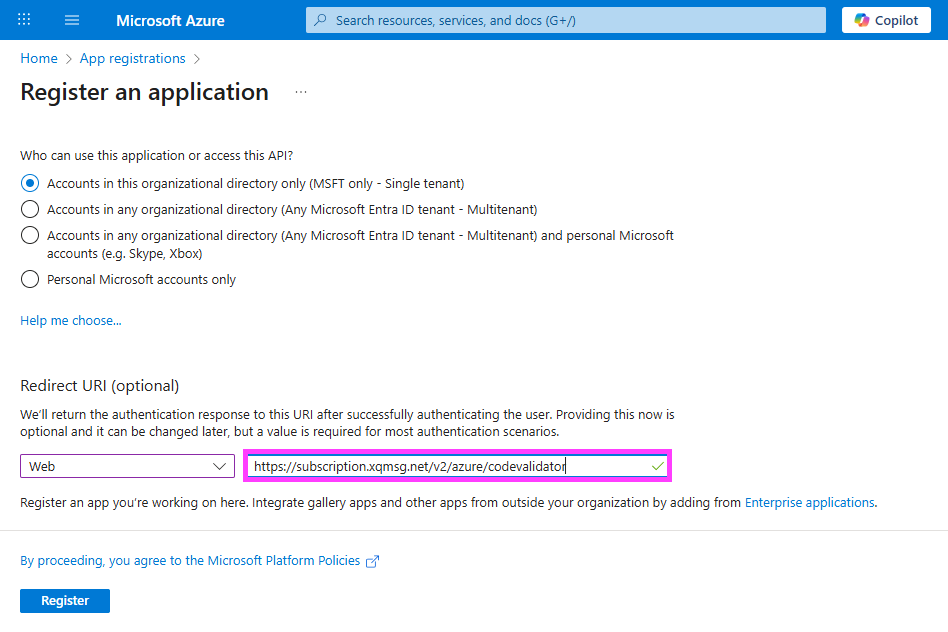
- Configure Basic Settings
- Fill in the registration form:
- Name: Enter a descriptive name for your app (e.g., ‘XQMSG Integration’)
- Supported account types: Select the option that matches who can authenticate into your XQ team
- Fill in the registration form:

- Add Redirect URIs
- In the Redirect URI section, select Web from the dropdown, then enter the following URL:
- Navigate to Certificates & Secrets
- After your app is registered, you’ll see the Overview page. Click the Add a certificate or secret link in the top right of the overview section.
- Create a Client Secret

- Configure and Save the Secret
- Fill in the secret details:
- Description: Enter a meaningful description (e.g., ‘XQMSG Integration Secret’)
- Expires: Select an expiration period based on your security requirements
- Click Add to generate the secret.
- Fill in the secret details:
- Copy the Client Secret Value
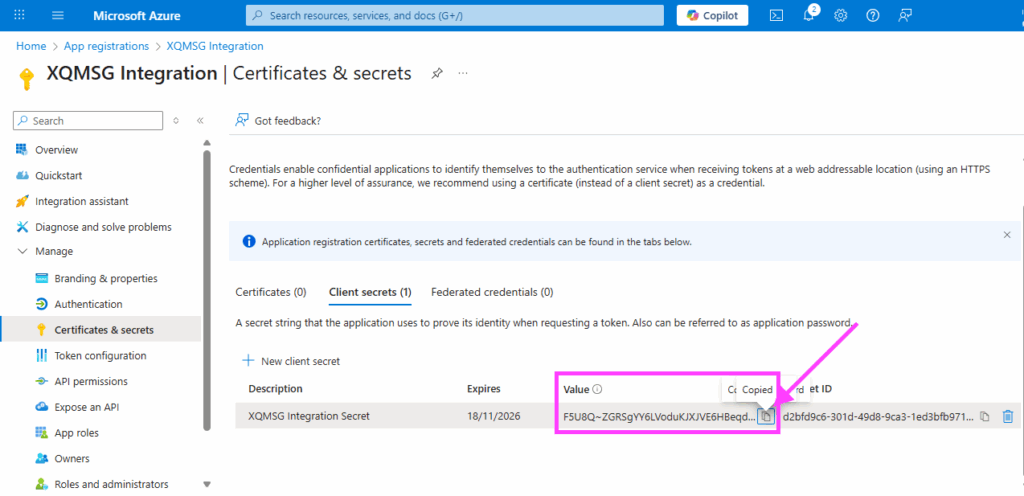
Important: Copy the Value that appears after creating the secret. This is your Client Secret, and you’ll need it later when configuring XQ. This value will only be shown once! Store it somewhere safe.
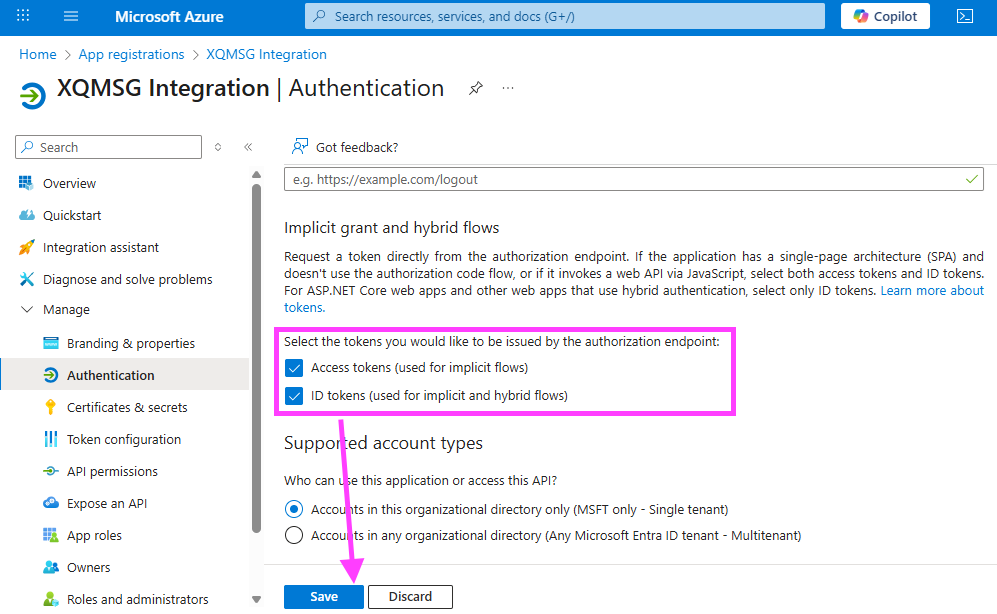
- Configure Token Settings
- On the Authentication page, scroll down to the Implicit grant and hybrid flows section and check both:
- ID tokens
- Access tokens
- Click Save at the bottom of the page.
- On the Authentication page, scroll down to the Implicit grant and hybrid flows section and check both:
- Add API Permissions
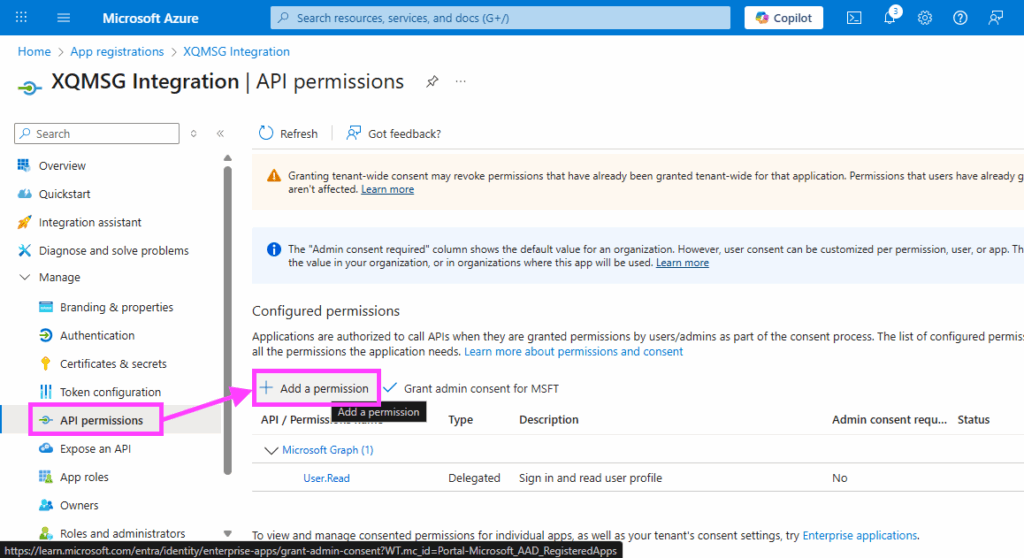
- Select Microsoft Graph Permissions
- In the Request API permissions panel:
- Click on Microsoft Graph
- In the Request API permissions panel:
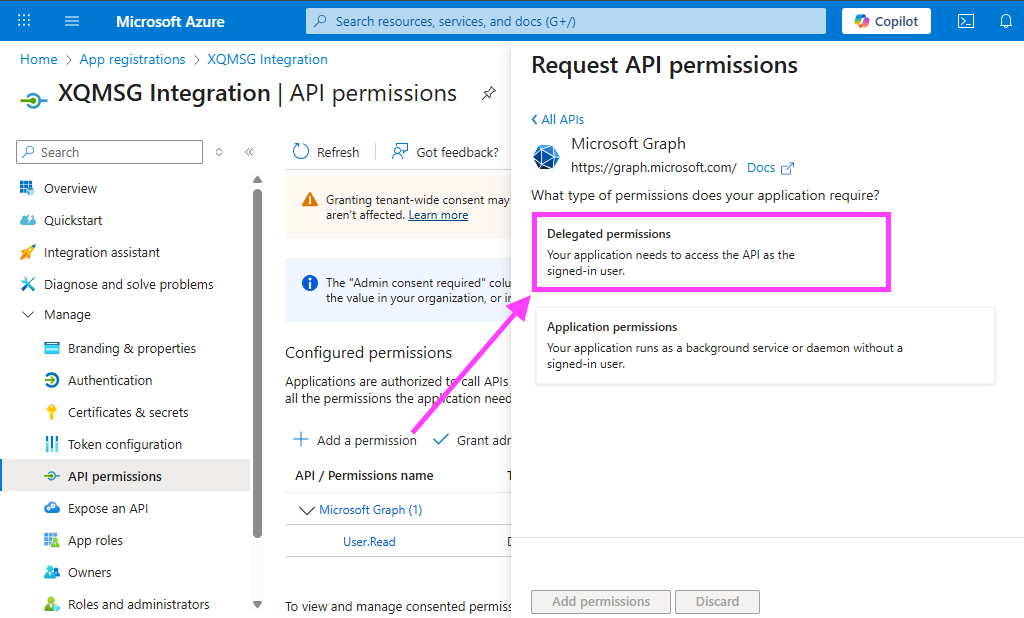
- Select Delegated permissions
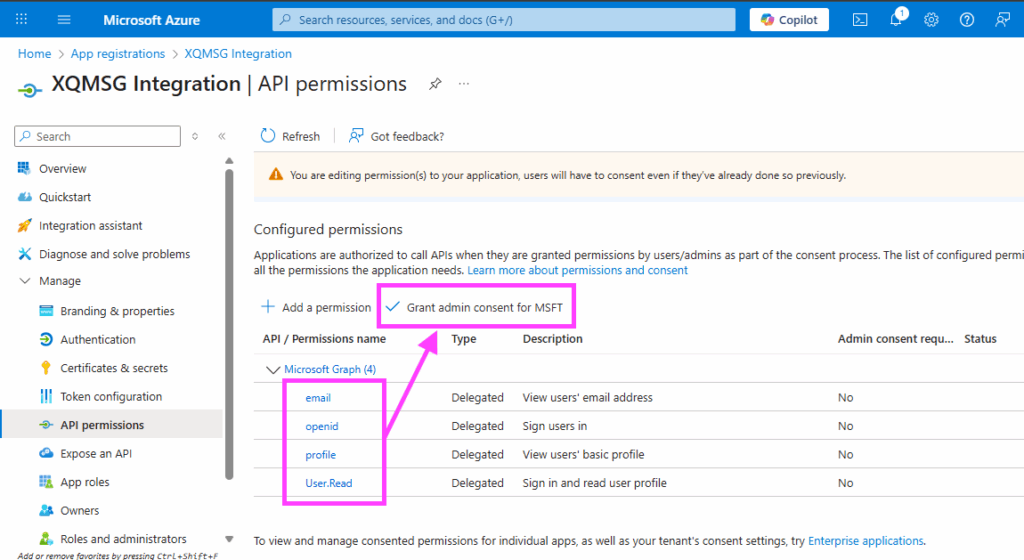
- Use the search field to find and check the following permissions:
- openid
- profile
- User.Read
- Use the search field to find and check the following permissions:
- Click Add permissions at the bottom
- Grant Admin Consent
Why this matters: This step allows users in your organization to authenticate without needing to individually consent to permissions.
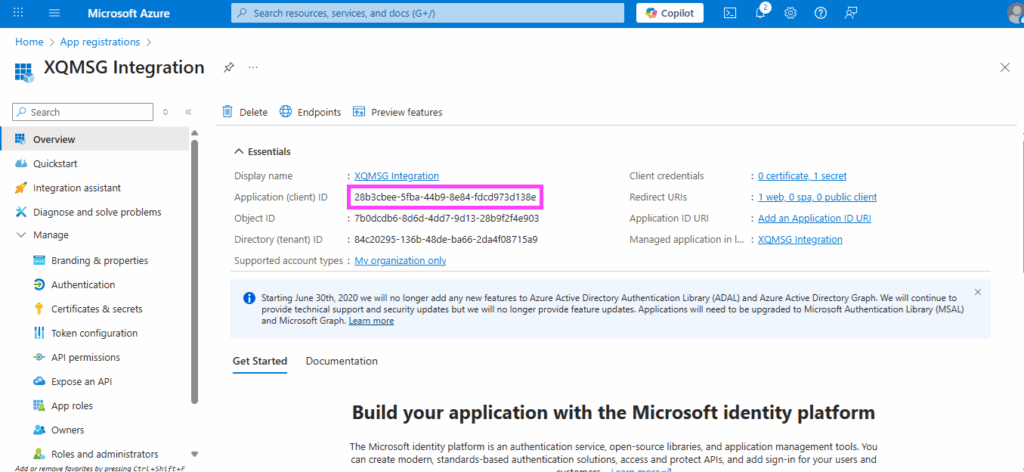
- Copy the Application (Client) ID
- Go back to the Overview section. Find and copy the Application (client) ID. You’ll need this value to configure XQ.
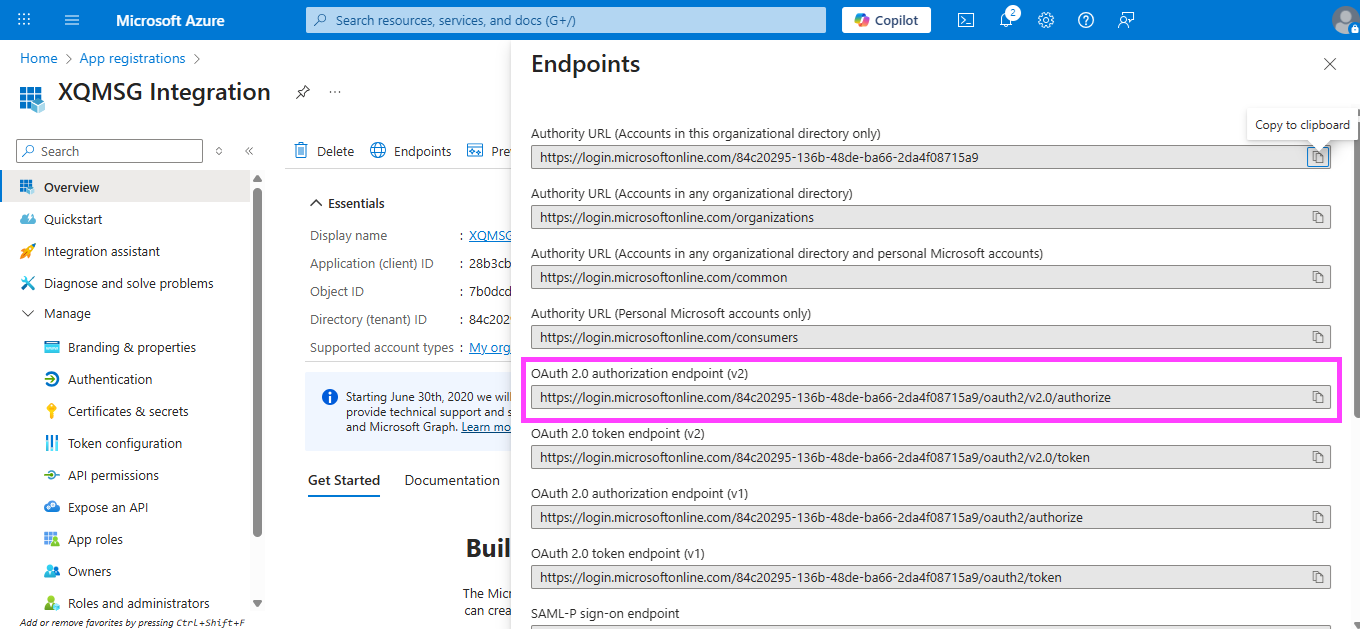
- Get the Authorization Endpoint
- Still on the Overview page, click Endpoints at the top.
Connecting to XQ
Now that you’ve gathered all the necessary information from Azure, it’s time to configure XQ. You’ll need to enter the values you collected into the XQ Management Portal.
Required Information
You should have collected the following values from Azure:
- Login Domain (from Step 15)
- Format: login.microsoftonline.com/YOUR_TENANT_ID/oauth2/v2.0/authorize (without https://)
- Login Audience
- Login Client ID
- This is your Application (client) ID
- Login Client Secret
- This is the secret value you copied and saved securely
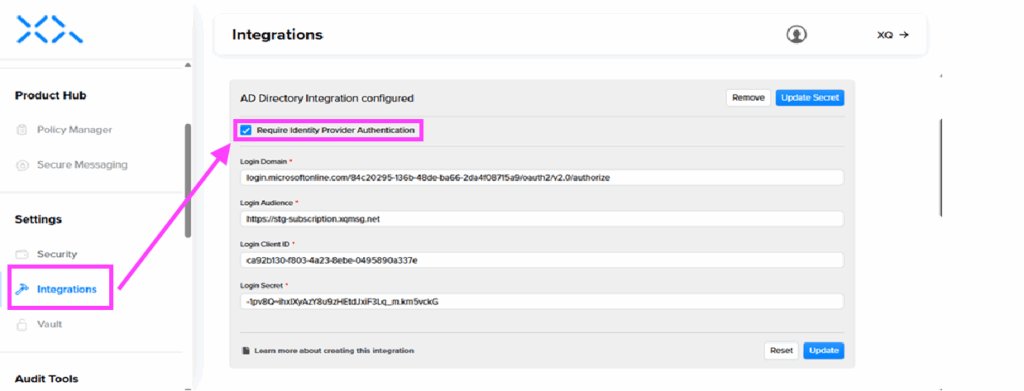
Entering Values in XQ
To complete the integration, log into your XQ Management Portal and navigate to the identity provider configuration section. By checking Require Identity Provider Authentication checkbox. Enter the values you collected above in their corresponding fields.
Testing Your Integration
After configuring the integration in XQ, it’s important to test that everything is working correctly.
- Log out of XQ and attempt to log back in using your Entra ID credentials
- Verify that you’re redirected to the Microsoft login page
- Confirm that you can successfully authenticate and access XQ
- Test with multiple user accounts to ensure permissions are working correctly
Troubleshooting
If you encounter issues during setup or testing, here are some common solutions:
- Redirect URI mismatch
- Make sure the redirect URI in Azure exactly matches the URL you’re using for XQ (staging or production). Even a small difference will cause authentication to fail.
- Permission errors
- Double-check that you’ve granted admin consent for all required permissions (email, openid, profile, and User.Read).
- Token configuration issues
- Verify that both ID tokens and Access tokens are enabled in the Authentication settings.
- Tenant ID problems
- If your endpoint contains /common/ or /organizations/, make sure you’ve replaced it with your actual Tenant ID in the Login Domain field.
Okta
Connecting Okta as a Single Sign-On (SSO) provider with XQ requires your users to authenticate into XQ products using their Okta credentials. This integration uses OpenID Connect (OIDC) to provide a seamless and secure login experience for your team.
Prerequisites
Before you begin, ensure you have:
- Administrator access to your Okta account
- Administrator access to the XQ Management Portal
- Your XQ environment URL (Staging or Production)
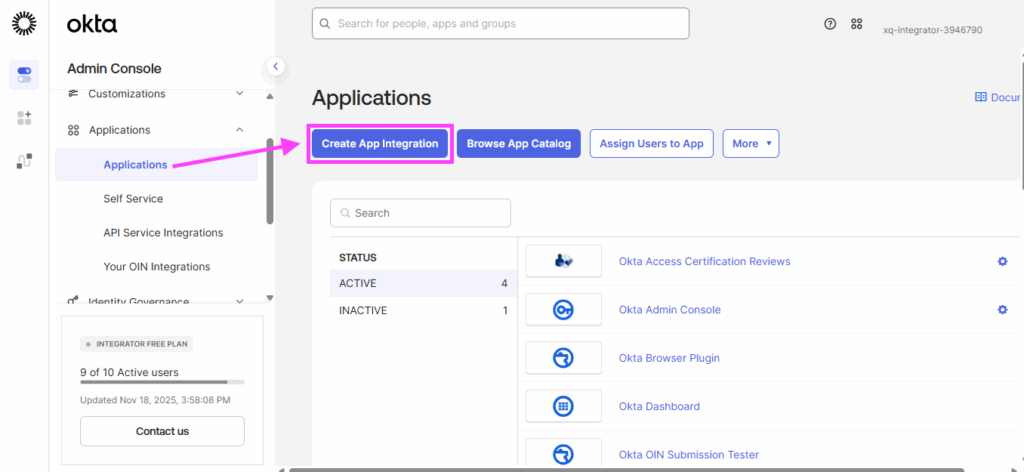
Part 1: Creating the Okta Application
In this section, you’ll create a new OIDC application in Okta that will enable SSO for XQ.
- Login to your Okta domain and authenticate using your administrator credentials.
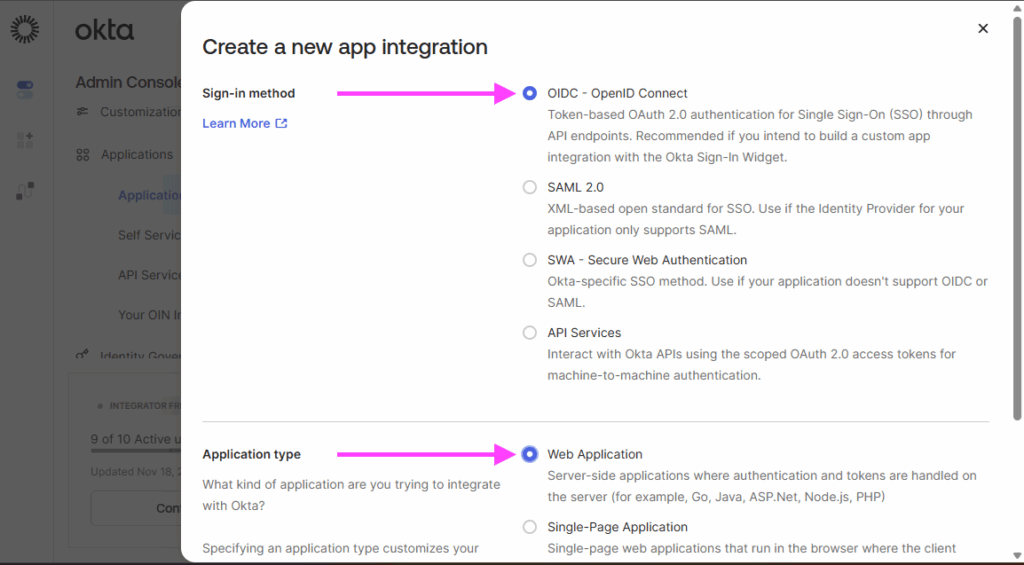
- In the modal that appears:
- Select OIDC – OpenID Connect as the sign-in method
- Select Web Application as the application type
- Click Next
- Provide a name for your application integration (recommended: “XQ Message SSO”). Optionally, you can upload a logo for easier identification.
- In the Grant type section, check both:
- Client Credentials
- Refresh Token

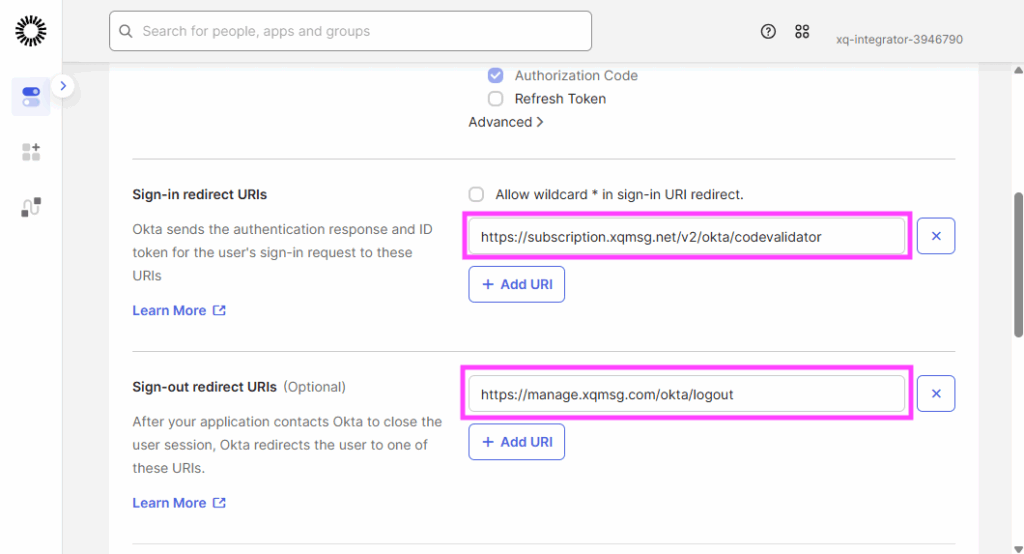
- In the Sign-in redirect URIs field, enter the appropriate URL for your XQ environment:
- In the Sign-out redirect URIs field, enter the URL for your XQ environment:
- In the Assignments section, select Allow everyone in your organization to access.
- Important: Do NOT enable immediate access with Federation Broker Mode.
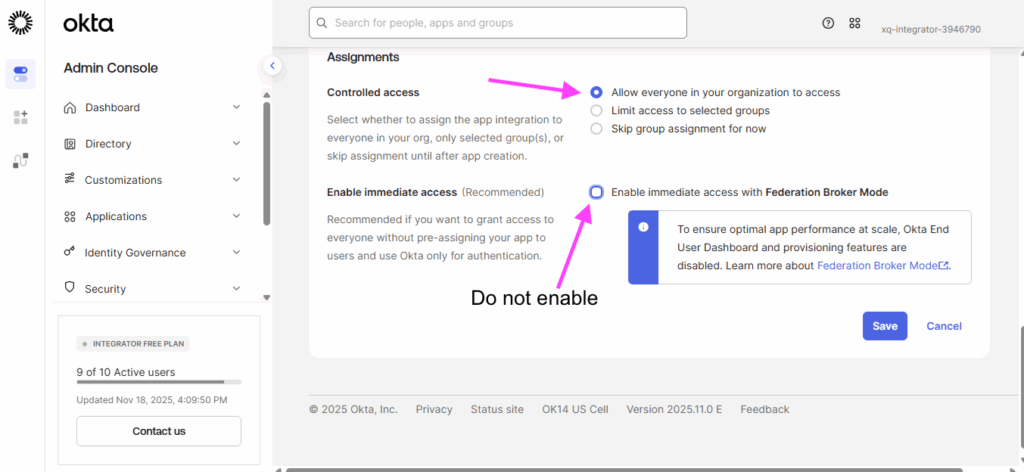
- Click Save to create the application.
- After the application is created, copy and save both the Client ID and Client Secret. You’ll need these values when configuring XQ.
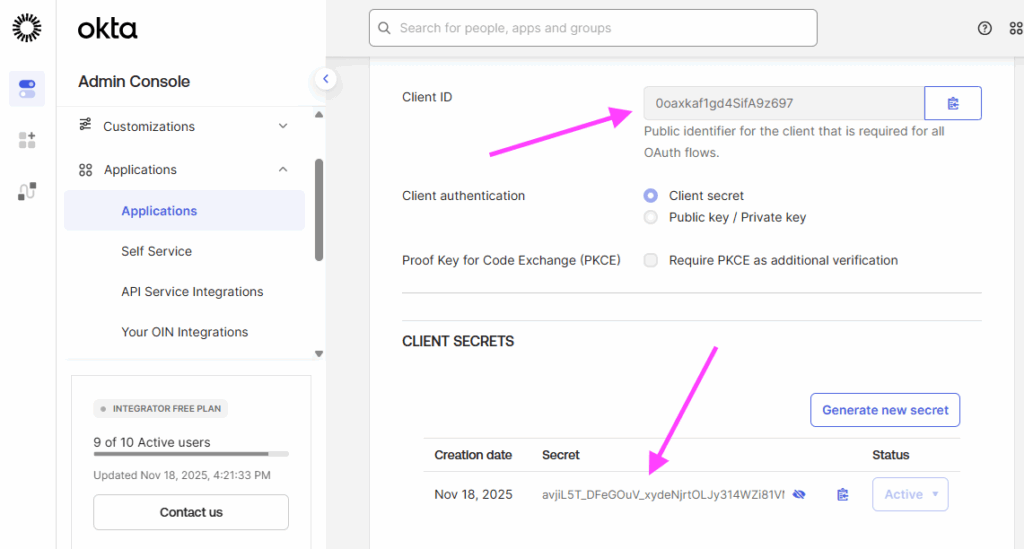
Note: The Client Secret will only be displayed once. Make sure to save it in a secure location.
Configuring API Scopes
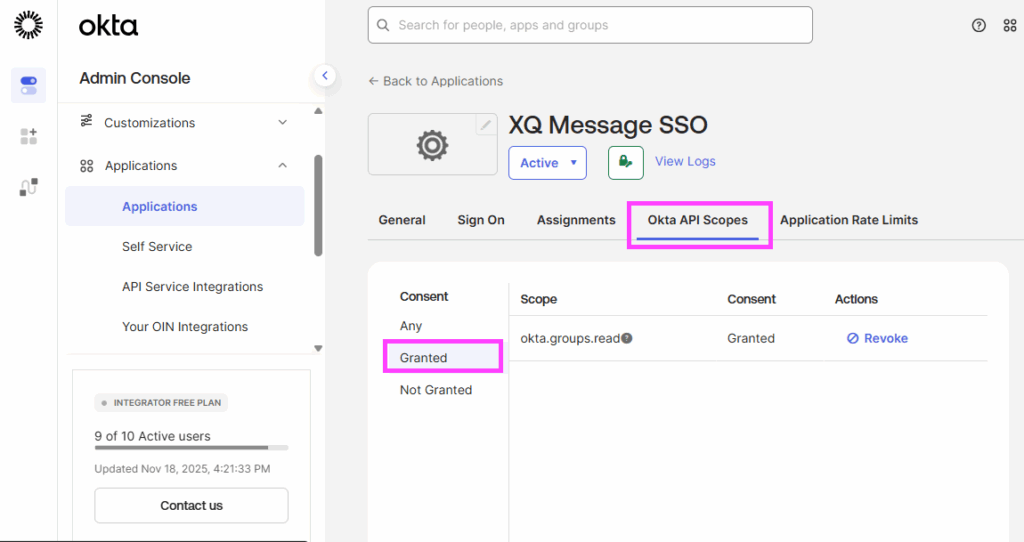
Note: This scope allows XQ to read group information from Okta, which is necessary for applying group-based policies.
Assigning Users to the Application
- Assign the users or groups that should be able to authenticate into XQ using this application. You can select specific users, or assign Everyone under Assign to Groups.
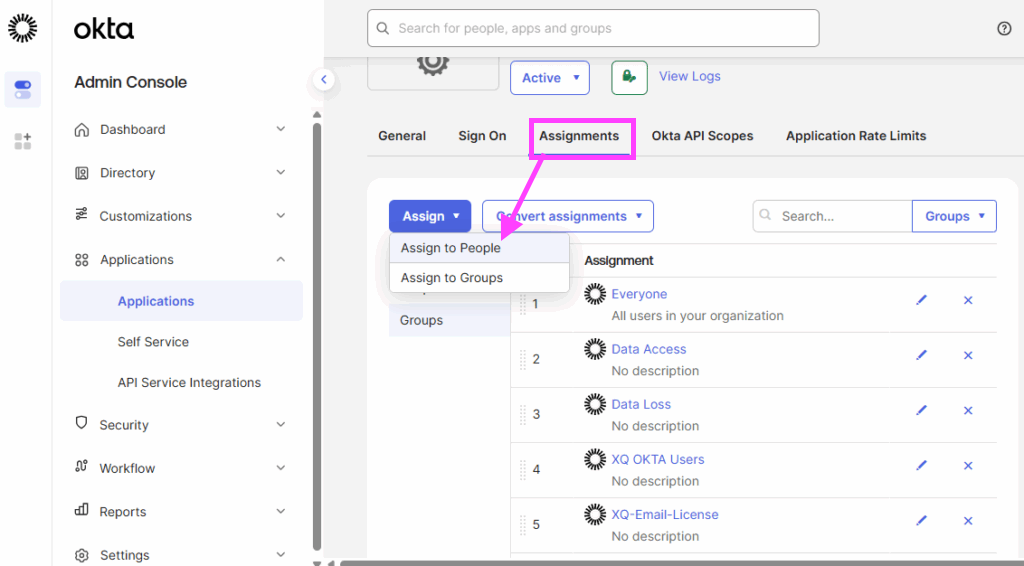
Note: Only users who are assigned to this application will be able to use Okta SSO to log into XQ.
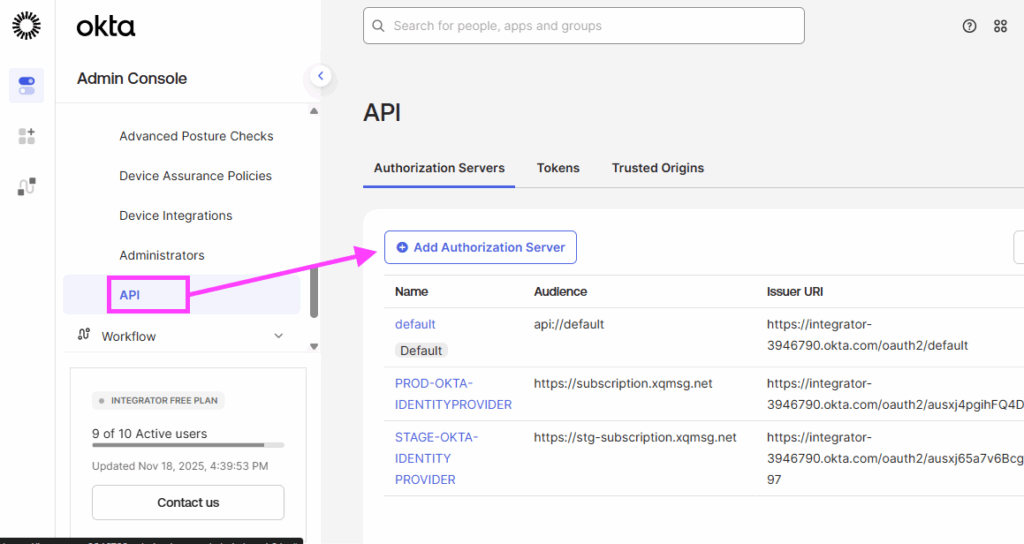
Part 2: Creating an Authorization Server
Next, you’ll create a custom authorization server in Okta that will handle authentication requests from XQ.
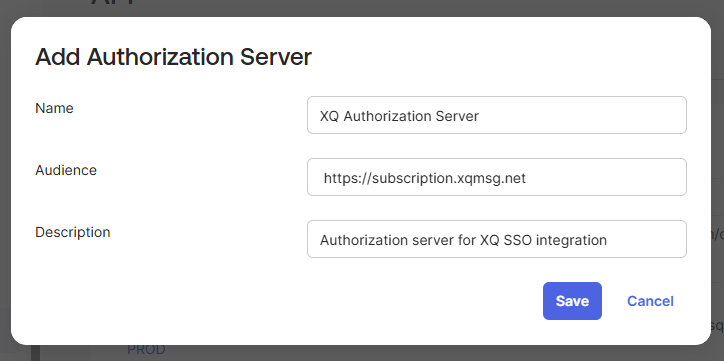
- Fill in the authorization server details:
- Audience: Enter the appropriate URL for your XQ environment:
Configuring Access Policies
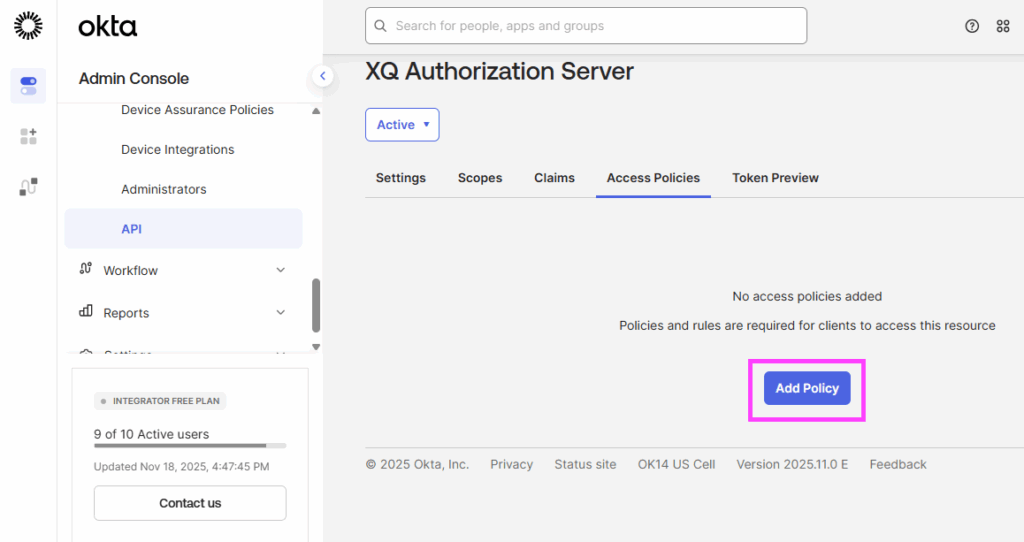
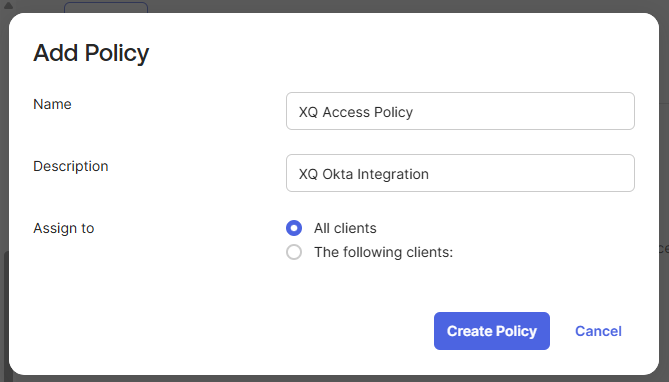
- Fill in the policy details:
- Name: Provide a descriptive name (e.g., “XQ Access Policy”)
- Description: Provide a brief description
- Assign to: Select All clients
- Click Create Policy.
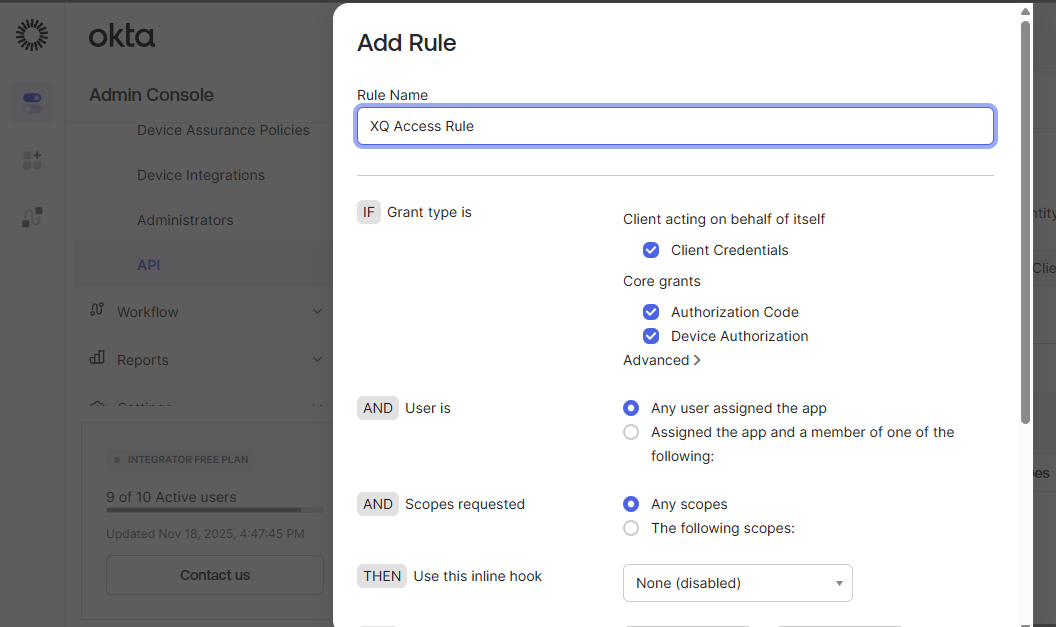
Creating a Policy Rule
- Provide a descriptive name for your rule (e.g., “XQ Access Rule”).
- Leave all other settings at their default values and click Create Rule.
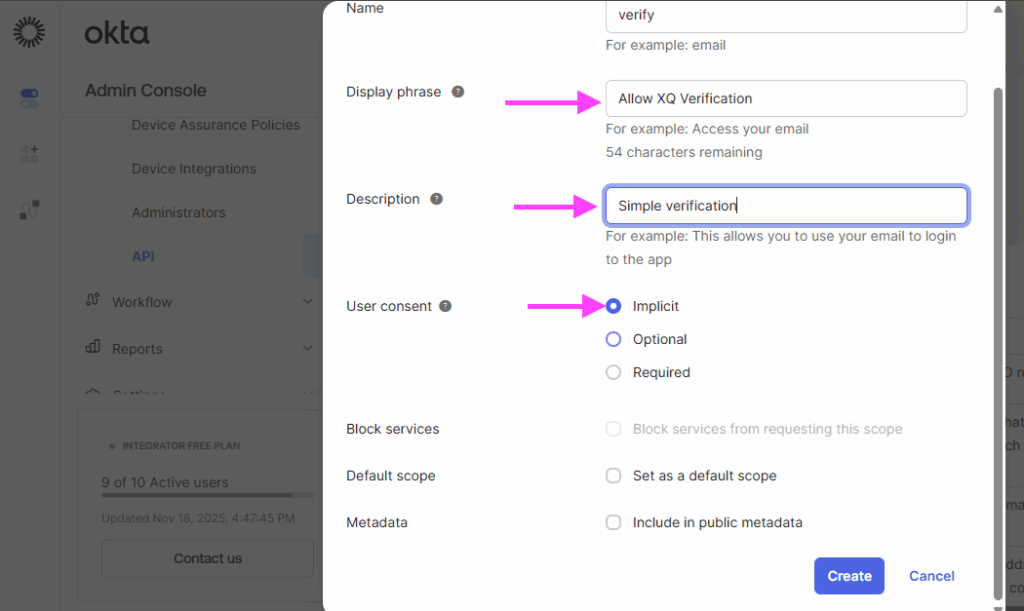
Adding a Custom Scope
- Fill in the scope details with the following values:
- Name: verify
- Display phrase: Allow XQ Verification
- Description: Simple verification
- User consent: Implicit
- Click Save to create the scope.
Getting Your Login Domain
Part 3: Configuring XQ
Now that you have all the required information from Okta, you’ll need to configure these values in the XQ Management Portal. Below is a summary of the values you’ll need:
| XQ Field | Where to Find in Okta |
| Login Domain | Authorization Server Issuer URI (without https://) |
| Login Audience | Authorization Server Audience |
| Login Client ID | Application Client ID |
| Login Client Secret | Application Client Secret |
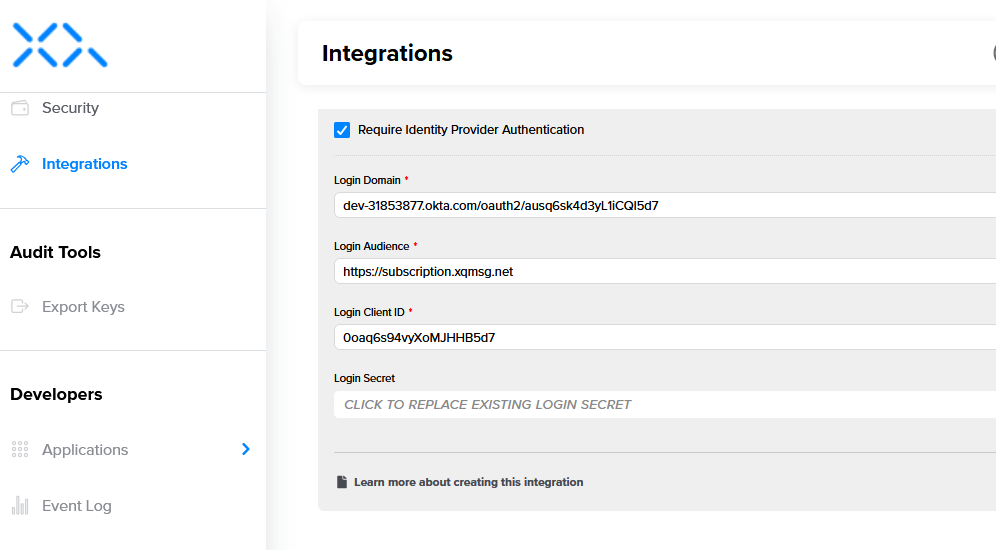
Entering Your Okta Configuration in XQ
To complete the integration:
- Log in to your XQ Management Portal
- Locate the Okta SSO configuration area
- Enter the four values from the table above
- Save your configuration
Once saved, users assigned to the Okta application will be able to log into XQ using their Okta credentials.
Testing Your Integration
After completing the configuration, it’s important to test the integration:
- Log out of XQ if you’re currently logged in
- Enter your email in the ‘Email address’ field and click the link delivered to your inbox.
- Select your team, if prompted, and sign-in with your Okta credentials
- Verify you’re successfully redirected back to XQ and logged in
Troubleshooting
If you encounter issues with your Okta SSO integration:
- Redirect URI mismatch: Verify that the redirect URIs in Okta exactly match the environment you’re using (staging vs. production)
- Login Domain issues: Ensure you removed the https:// prefix from the Issuer URI when entering the Login Domain in XQ
- User not assigned: Check that the user attempting to log in is assigned to the Okta application
- Client Secret expired: Client secrets can expire. Generate a new one in Okta and update it in XQ if needed
You’re All Set!
Your Okta SSO integration is now configured. Users assigned to the Okta application can now use their Okta credentials to securely log into XQ. This provides a seamless single sign-on experience while maintaining strong security practices.
Need Help?
If you encounter any issues or have questions about the Okta SSO integration, please contact our support team at support@xqmsg.com.
Leave a Reply