Configuring Vault Sharing and Secure Intake with Microsoft Sharepoint
This configuration allows users within your organization to share files externally with Vault and to request external users to share files to your organization (Secure Intake). Both of these features store the shared and received files within the customer’s sharepoint environment and so needs to be configured to ensure both access and security.
This guide walks you through setting up the configuration of both Azure and Sharepoint to support these features.
Overview
What you’ll accomplish:
- Configure Azure applications for secure file access
- Set up certificate-based authentication
- Grant appropriate permissions to SharePoint sites
- Enable Vault Share in your XQ Portal
Prerequisites
Before you begin, make sure you have:
- Azure admin access with ability to grant consent
- SuperUser access in XQ Portal
- A SharePoint site where Vault files will be stored (this can be a private site with no guest access)
- PowerShell 7 installed
- Windows users: PowerShell 7 will be automatically detected and installed by the
makecert.batscript (below) if not present
- Windows users: PowerShell 7 will be automatically detected and installed by the
- Certificate generation tools:
- Windows: The provided
makecert.batscript
- Windows: The provided
Step 1: Create a SharePoint Site
In this step, you will create a SharePoint site that will be used both for sharing Vault files externally and for receiving files with the Secure Intake feature. The site should be private (no one can navigate to the site) and the site does not need to be shared externally.
- Navigate to your SharePoint admin center
- Create a new site
- Team Site
- Basic Template
- Owner: MS Admin
- Members: None
One the site is created, copy the full site URL – you’ll need this later in Step 5 (e.g., https://yourdomain.sharepoint.com/sites/yoursite)
Note: This site can be private and doesn’t require guest access to function with Vault Share.
Step 2: Create Vault Application in Azure
This application will handle authentication between XQ Vault and your SharePoint site.
- Sign into entra.microsoft.com
- Navigate to App Registrations → New registration
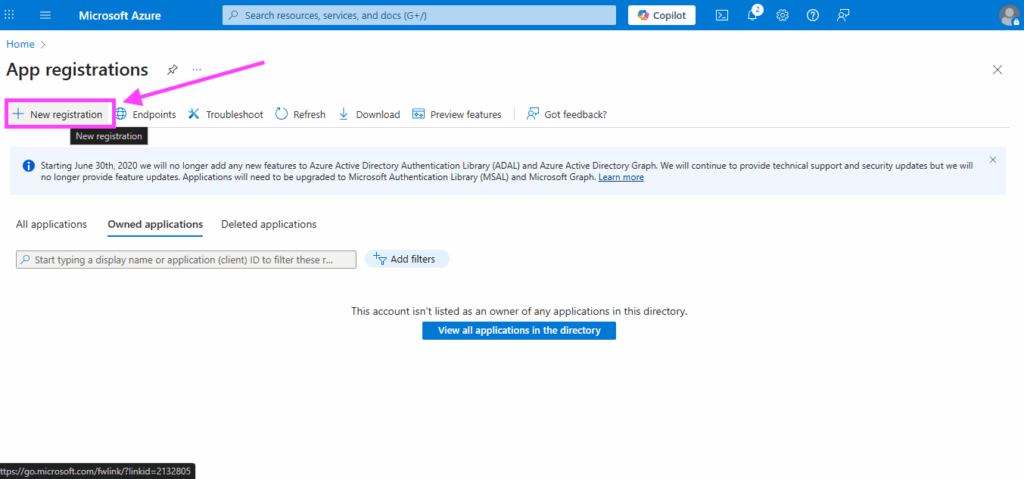
- Configure the registration:
- Enter a name for your app (e.g., “XQ Vault Share”)
- Set Account Type to Single Tenant
- Click Register

- After registration, navigate to the application Overview and copy and save:
- Application (client) ID
- Directory (tenant) ID
You’ll need these values later.
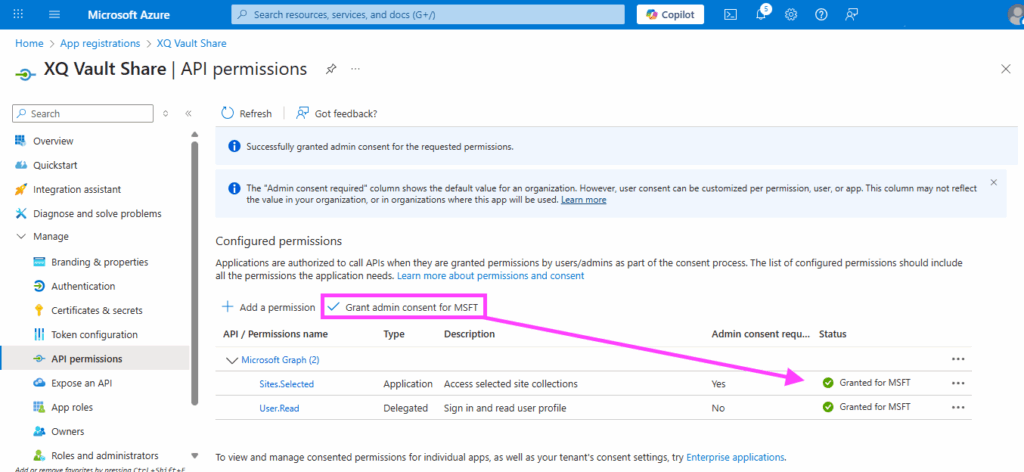
- Next go to API Permissions → Add a Permission
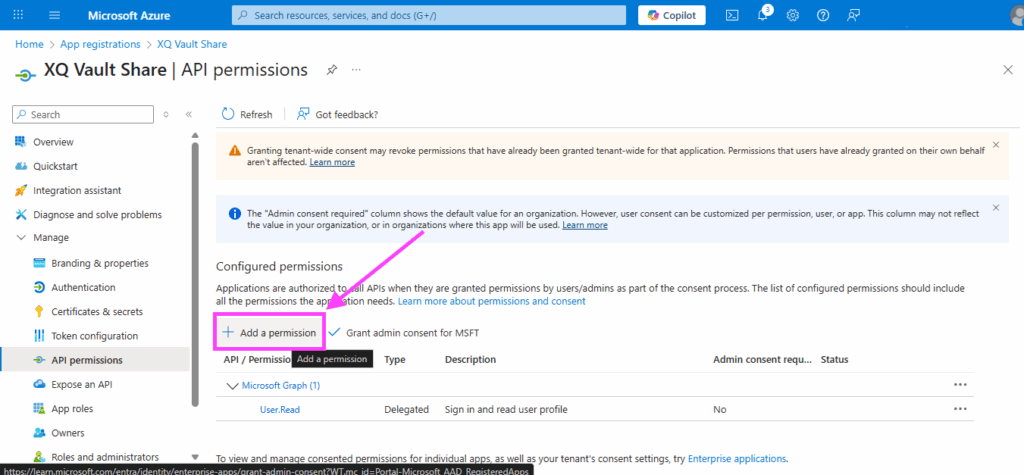
- Select Microsoft Graph → Application Permissions → Sites.Selected

After adding the permission, click Grant admin consent.
Note: This step requires admin privileges. You’ll see a green checkmark when consent is successfully granted.
Step 3: Generate Certificates
Certificate-based authentication provides secure, password-free access for the Vault application. You’ll need to generate certificates that meet Azure’s requirements.
For Windows Users
- Download this makecert.bat script and place it in a folder (running the .bat script will output the certificates to that folder).
- Right click and “Run as administrator” the provided makecert.bat script

- When prompted:
- Enter a base site name (default: vaultsharing)
- Enter certificate validity in days (default: 1095 for 3 years)
- The script will generate these files:
- [sitename].key – Private key
- [sitename].csr – Certificate signing request
- [sitename].crt – Self-signed certificate
- [sitename].cer – DER format for Azure
- [sitename].pem – PEM format for XQ Portal
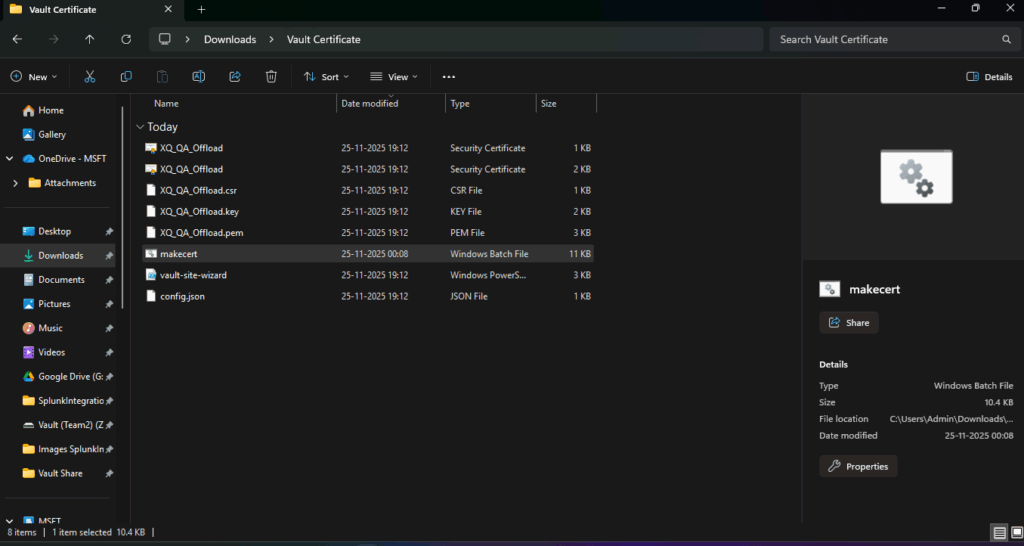
Note: The script will automatically install OpenSSL if needed and clean up afterward.
If you now have the certificates by following the steps above, you can advance to step 4 below.
Certificate Requirements
Supported Key Algorithms:
- RSA-2048 (recommended)
- RSA-3072
- RSA-4096
Note: ECDSA, EdDSA, and DSA algorithms are not supported by Azure Entra. Keys larger than 4096 bits will be rejected.
Supported Hash Algorithms:
- SHA-256 (recommended)
- SHA-384
- SHA-512
Important: SHA-1 and MD5 are deprecated and will be rejected by Azure Entra.
Certificate Formats:
- For Azure Entra, upload:
- .cer file (DER-encoded, public certificate only)
- .pem file (PEM-encoded, public certificate only)
Note: Azure will not accept files containing private keys.
For XQ Portal, upload:
- .pem file containing both the certificate and unencrypted private key (concatenated in that order)
Step 4: Upload Certificate to Azure
Now you’ll upload the public certificate to your Azure app registration.
- Return to your Vault app registration in Azure
- Go to Manage → Certificates & Secrets
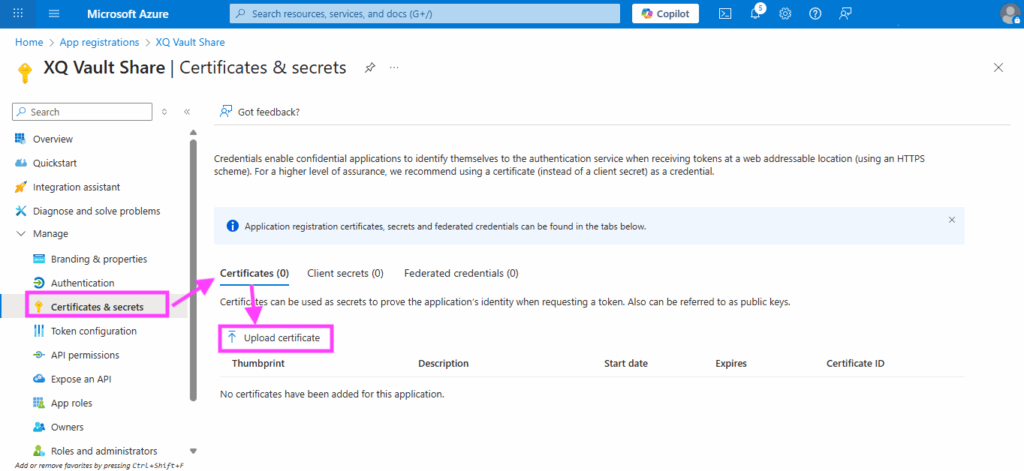
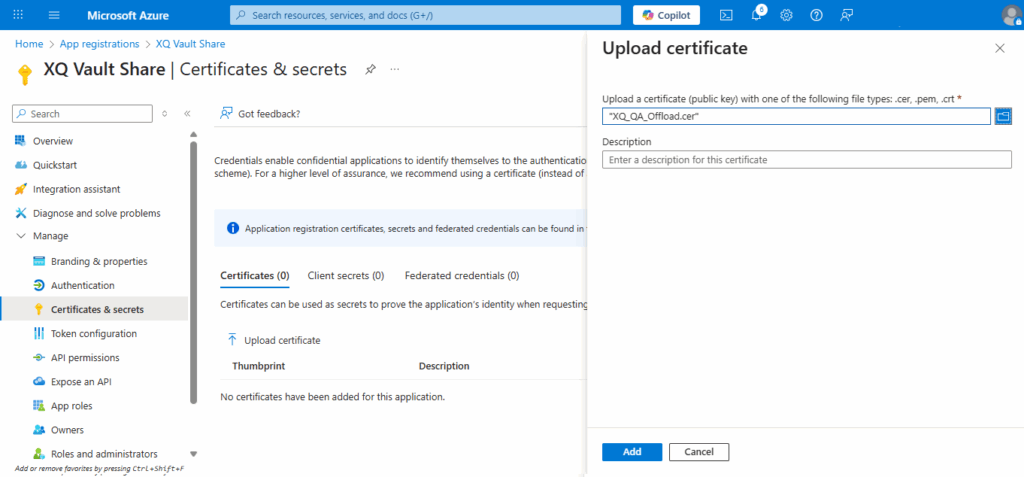
- Switch to the Certificates tab → Click Upload Certificate
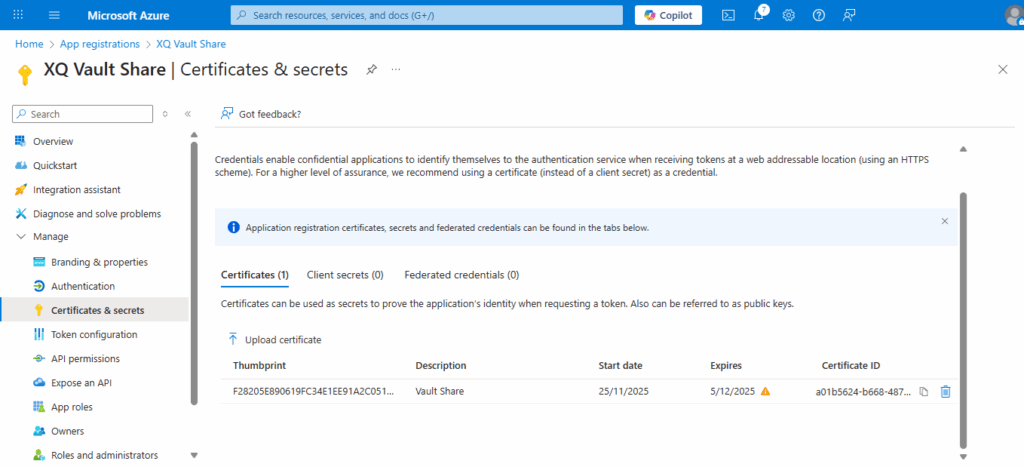
- Upload the .cer file you created in Step 3
- Verify the certificate appears in the list with correct expiration date. Your expiration date will be based on the value you entered while running the
makecert.batscript in step 3 above.
Step 5: Create PnP Management Application
This application will be used to configure permissions on your SharePoint site.
- Navigate to App Registrations → New registration
- Configure the registration:
- Enter a name (e.g., “XQ PnP Management”)
- Set Account Type to Single Tenant
- Click Register
- After registration, copy and save:
- Application (client) ID
- Directory (tenant) ID
- Go to Manage → Authentication
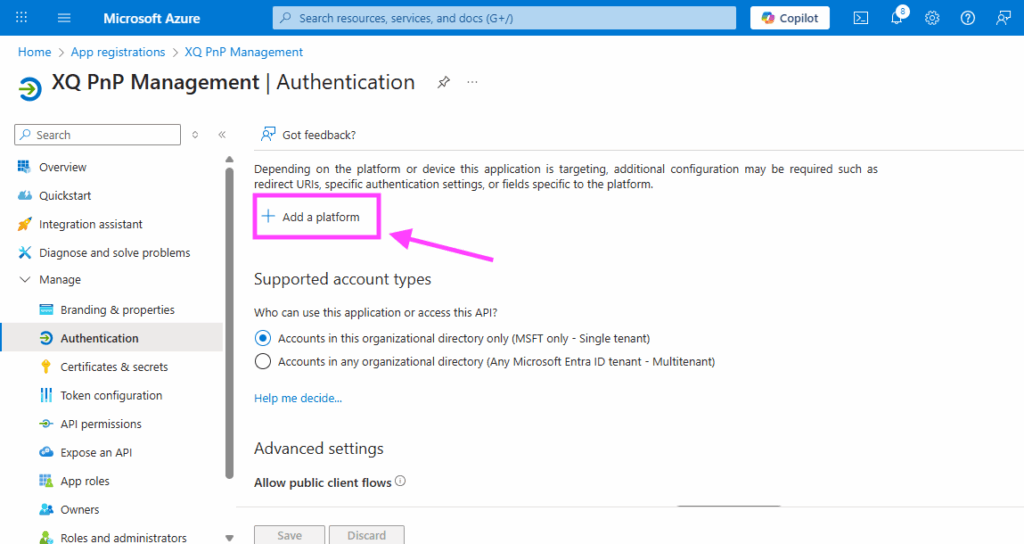
- Click Add a platform → Mobile and Desktop Applications
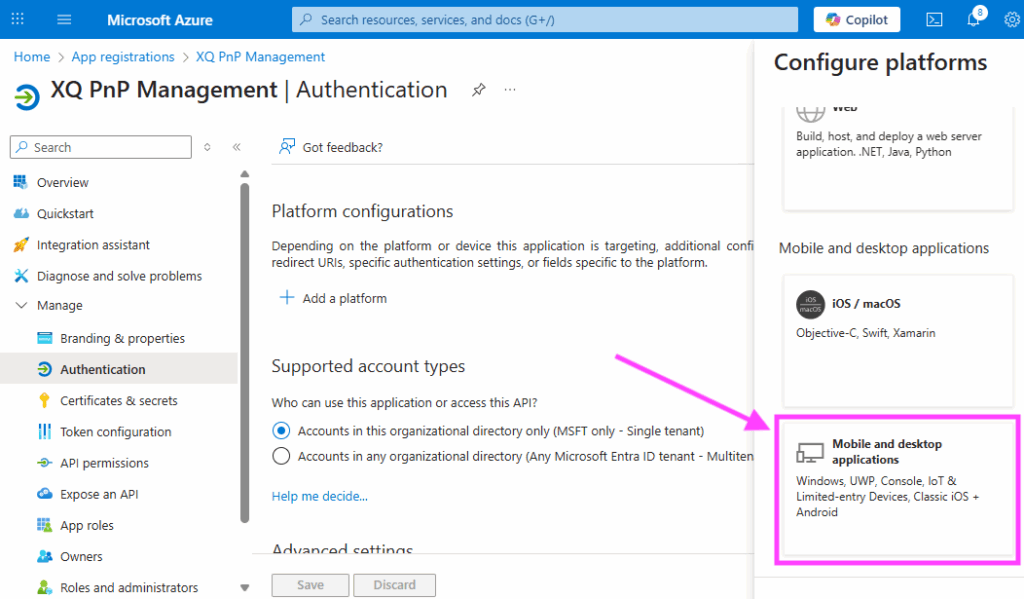
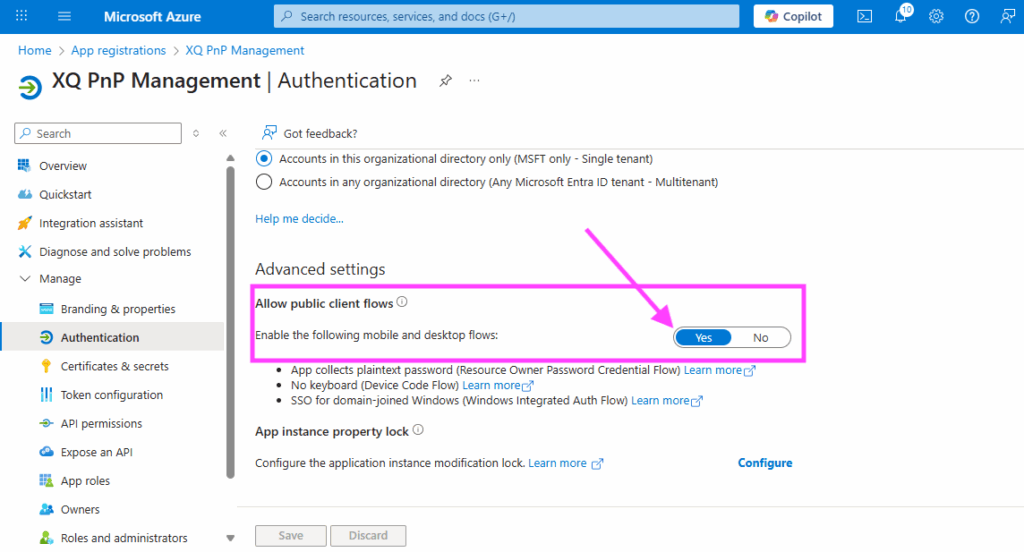
- Add Custom Redirect URI: http://localhost
- Under Advanced Settings, enable Allow public client flows toggle and click Save
- Go to API Permissions → Add a Permission
- Add Sites.FullControl.All (Delegated permission)
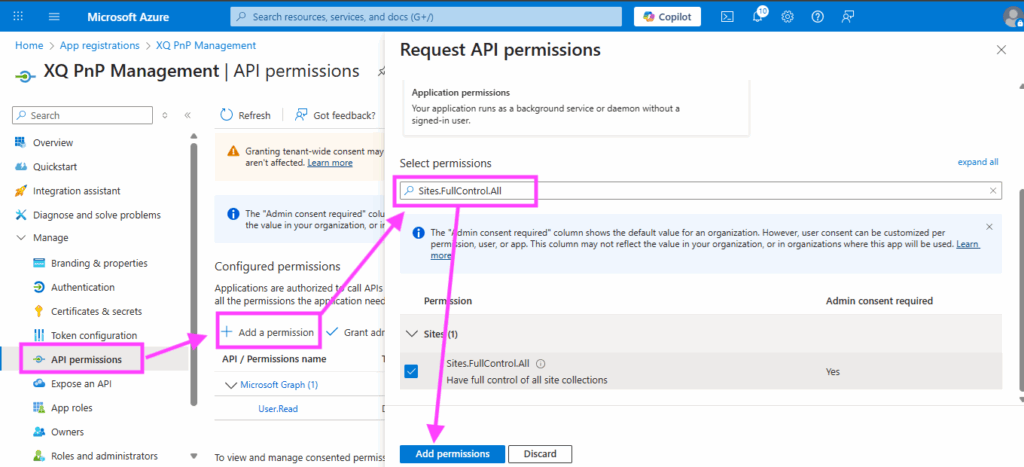
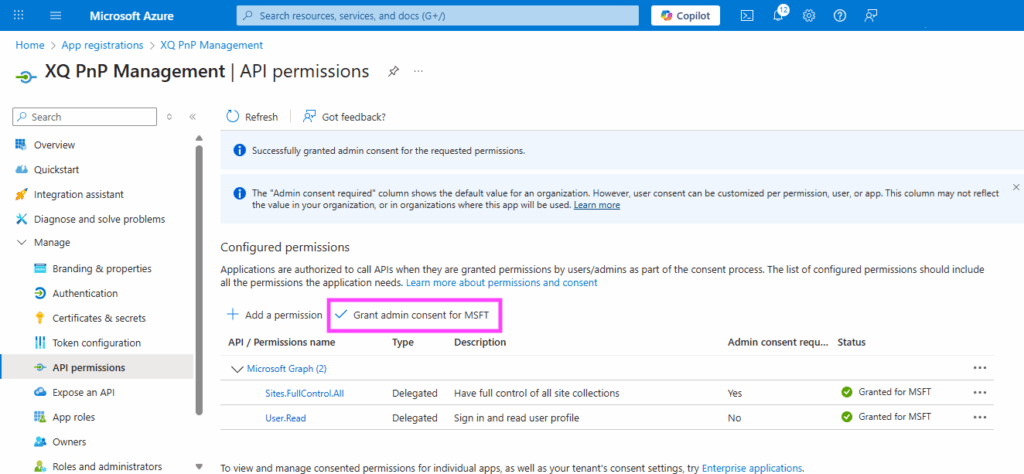
- Click Grant admin consent
Step 6: Configure Site Permissions
Now you’ll configure which SharePoint sites the Vault application can access.
- Locate the
config.jsonfile in your installation directory–in the output folder from running themakecert.bat
- Open the file and update it with your values:
{
"PnPAppClientId": "CLIENT_ID_FROM_STEP_5",
"PnPAppTenantId": "TENANT_ID_FROM_STEP_5",
"VaultAppClientId": "CLIENT_ID_FROM_STEP_2",
"VaultAppName": "VaultAppNameFromStep2",
"Sites": [
{
"Url": "https://YOURDOMAIN.sharepoint.com/sites/YOURSITE",
"Permission": "Write",
"Action": "Grant"
}
]
}
Configuration Field Reference
| Field | Source | Description |
|---|---|---|
| PnPAppClientId | Step 5 | Application (Client) ID of the PnP Management App |
| PnPAppTenantId | Step 5 | Directory (Tenant) ID of the PnP Management App |
| VaultAppClientId | Step 2 | Application (Client) ID of the Vault Sites App |
| VaultAppName | Step 2 | Display name of the Vault Sites App (optional, for readability) |
| Sites[].Url | Step 1 | Full URL to your SharePoint site – must match the exact path shown in SharePoint |
| Sites[].Permission | N/A | Permission level – use “Write” for Vault Share |
| Sites[].Action | N/A | Use “Grant” to enable access or “Revoke” to remove access |
- Save the config.json file
- Launch PowerShell 7 with administrative privileges:
- Windows: Right-click PowerShell 7 → Run as Administrator
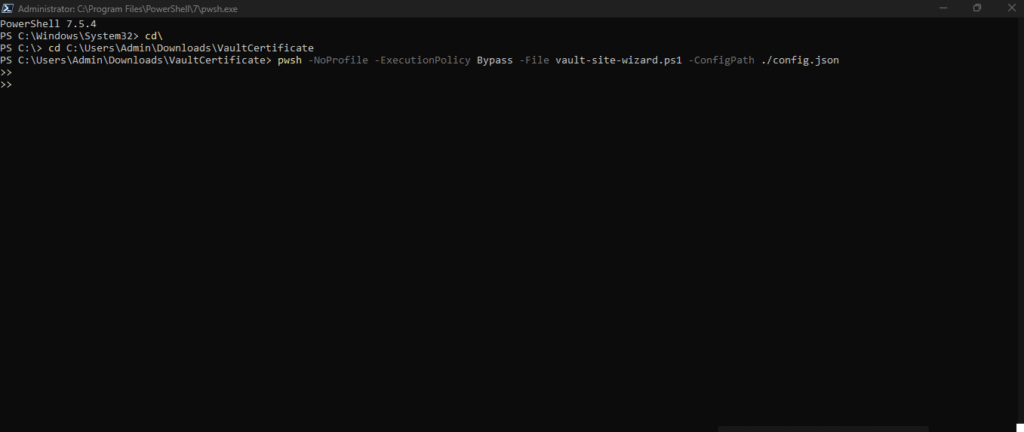
- Navigate to the directory containing the .ps1 script:
- Copying the path from windows explorer and then pasting it into PowerShell after ‘
cd‘:cd C:\path\to\your\script\directory
- Copying the path from windows explorer and then pasting it into PowerShell after ‘
- Run the configuration script (copy and paste the below code into Powershell7):
pwsh -NoProfile -ExecutionPolicy Bypass -File vault-site-wizard.ps1 -ConfigPath ./config.json
- When prompted, sign in as a SharePoint site administrator or owner for each site
- Wait for the script to complete – you’ll see confirmation messages for each site
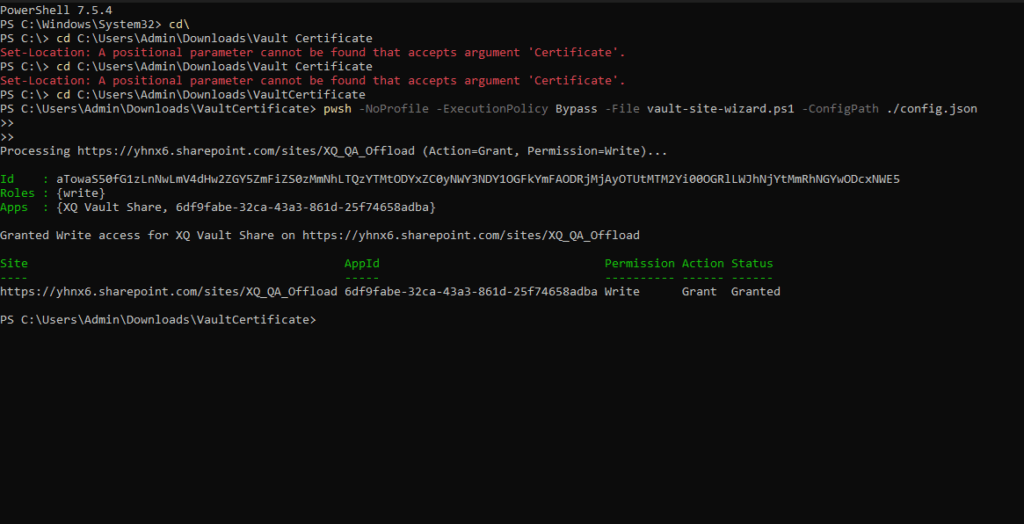
Note: To revoke permissions later, edit your config.json file and change “Action”: “Grant” to “Action”: “Revoke”, then run the script again.
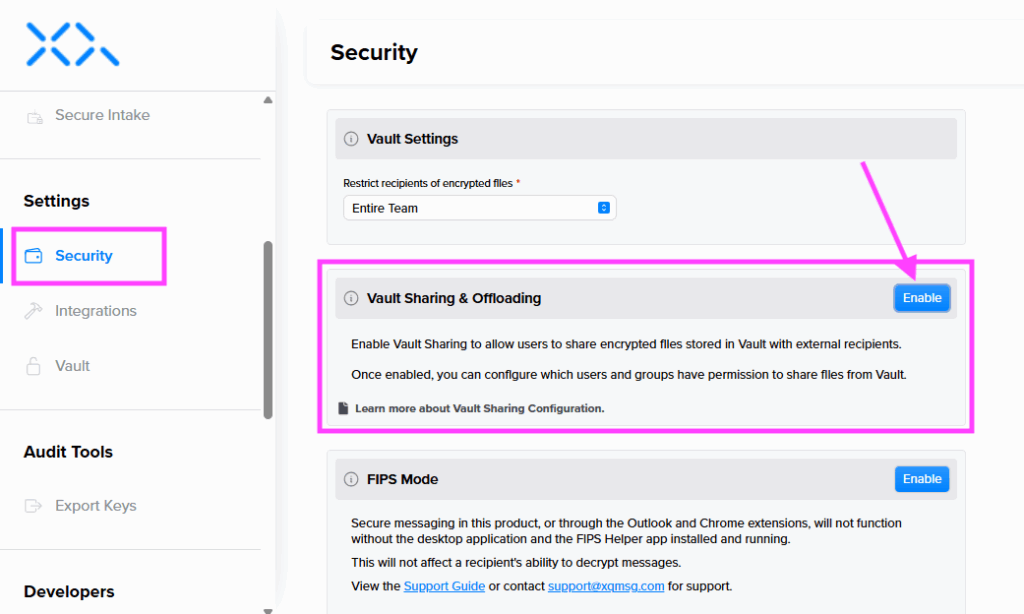
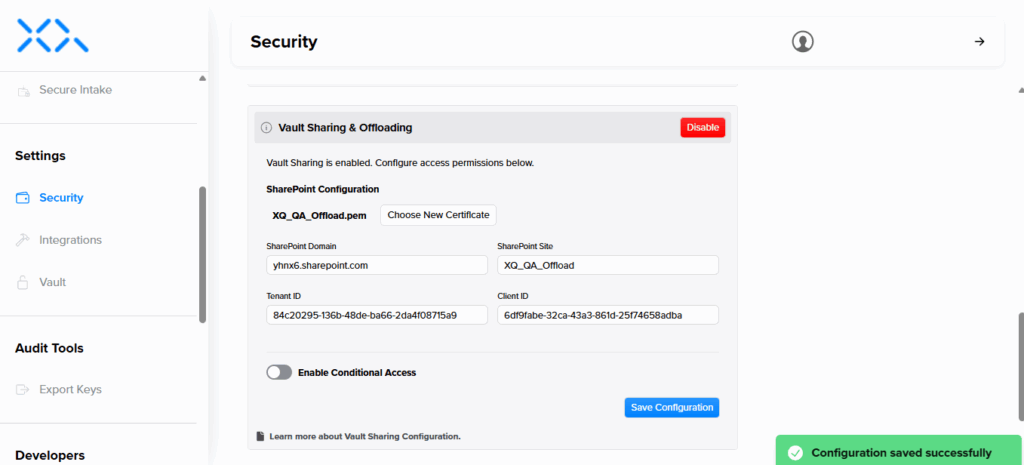
Step 7: Enable Vault Share in XQ Portal
The final step is to connect your XQ Portal to the Azure and SharePoint configuration you just created.
- Log into your XQ Portal as a SuperUser
- Navigate to the Security page
- Scroll to the Vault Sharing & Offloading section
- Click Enable
- Fill in the required information:
- Certificate file: Upload the .pem file you generated in Step 3
- SharePoint site URL: Your SharePoint site URL (e.g., https://hello.sharepoint.com/sites/Example)
- Tenant ID: The Directory (Tenant) ID from your Vault App (Step 2)
- Client ID: The Application (Client) ID from your Vault App (Step 2)
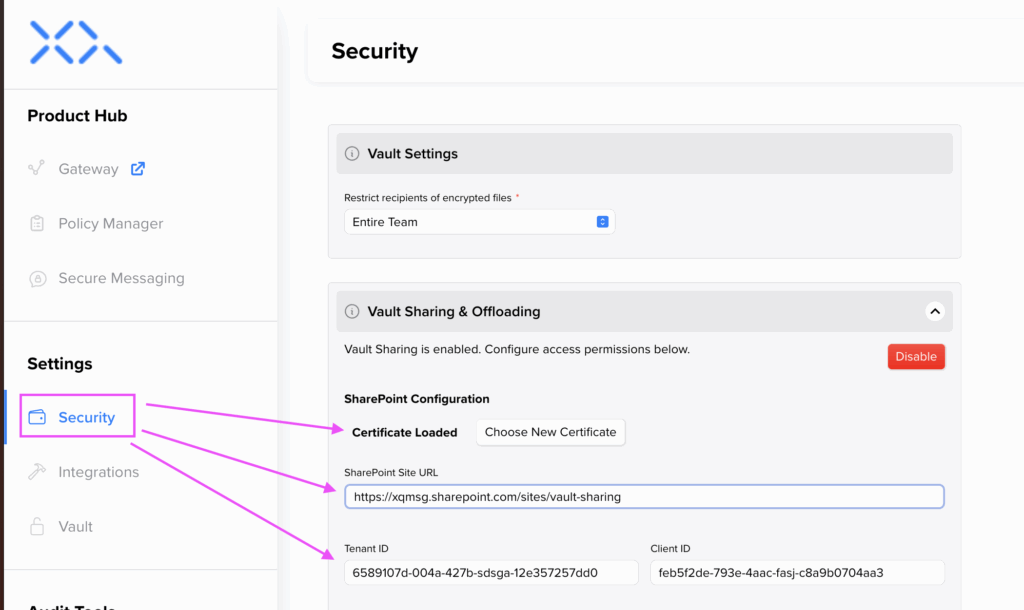
- Click Save or Enable to complete the configuration
- You should see a success message confirming Vault Share is now enabled
Verification
To verify your setup is working correctly:
- Open the XQ Vault application on your computer and login
- Go to the ‘Sharing’ tab in Vault
- Try sharing a new file (send to yourself)
- Confirm that when you receive the email with a download link to the file you can in fact download the file.
Troubleshooting
If you encounter issues during setup:
Certificate upload fails:
- Verify you’re uploading the .cer file to Azure (not the .pem file)
- Check that your certificate uses a supported algorithm (RSA-2048, RSA-3072, or RSA-4096)
- Ensure the certificate hasn’t expired
Permission script fails:
- Confirm you’re running PowerShell 7 with administrative privileges
- Verify the PnP Management App has Sites.FullControl.All delegated permissions
- Check that you’re signing in as a SharePoint site administrator or owner
Vault Share won’t enable in XQ Portal:
- Verify you’re uploading the .pem file (containing both certificate and private key)
- Double-check that your Tenant ID and Client ID are correct
- Ensure the SharePoint domain and site name match your actual site URL
I don’t see ‘Sharing’ in the Vault Application:
- Go to the Vault Download page and make sure you have the latest version of Vault.
Need Help?
Can’t find the answer you’re looking for? Our support team is here to help!
Contact Support: Visit XQ Support or click the Contact Support button in your XQ Portal.
Next Steps
Now that Vault Share is configured, you can:
- Learn how to use Vault Share features in the How to Use Vault guide
Your Vault Share integration is now complete and ready to use!
Leave a Reply