Connecting Okta with XQ enables you to quickly add users, assign licenses, require Okta based authentication, and synchronize groups for use in policies.
Table of Contents
Setting Up the Okta Integration in XQ
To set up this integration, admins are required to follow the steps below:
- Login to the XQ management portal and navigate to Integrations section in the sidebar.
- Ensure User Management is selected, then click the Configure button.
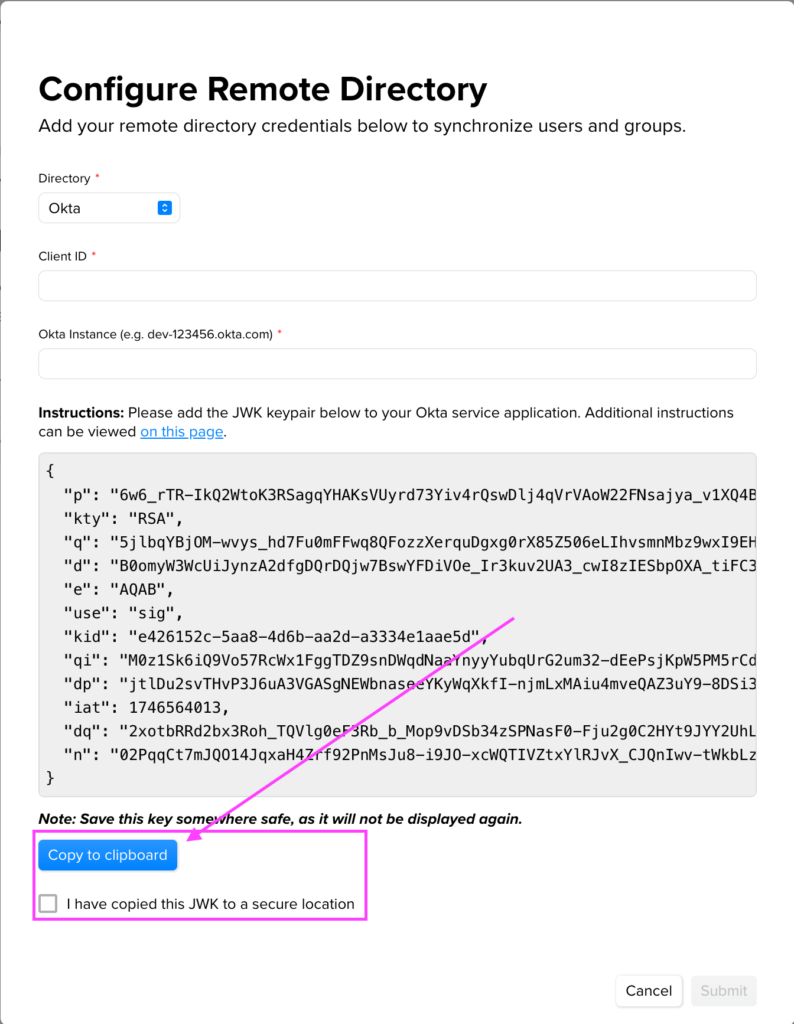
- Click on the Directory dropdown followed by selecting Okta.
- Click on the Copy to clipboard button as you will need the JWK keypair when setting up the Okta Application Integration in step 11 below.

- Leave this tab open as you will need to input the Client ID and Okta Instance ID once the Application Integration is set up.
Setting up an Application Integration in Okta
- Navigate to your Okta instance domain followed by authenticating using your Administrator credentials.
- On the left hand sidebar, click Applications followed by clicking on Application again in the popout menu.
- Click on the Create App Integration button followed by clicking on API Services in the “Create New app integration” modal and lastly click Next.
- In the Create SAML Integration menu provide an App Integration name, followed by clicking on Save.
- The App Integration Name is simply to help with identification within Okta.
- Click on Edit in the top-right hand corner of Client Credentials followed by clicking on the Public key / Private key option and then clicking on Add Key button.
- Paste the JWK Key Pair in the input area (the content you copied in step 4 above) followed by clicking on Done.
- When you add the key, the ‘Created Time’ may read as ‘Invalid DateTime’. This will be resolved when saving.
- When you add the key, the ‘Created Time’ may read as ‘Invalid DateTime’. This will be resolved when saving.
- Click on the Save button at the bottom of the Client Credentials section.
- You will get the following modal confirming the switch to Public Key/ Private Key – this is expected behavior. Click the Save button to finish.
- You will get the following modal confirming the switch to Public Key/ Private Key – this is expected behavior. Click the Save button to finish.
- Scroll down to the General Settings section to ensure that Require Demonstration Proof of Possession (DPoP) is selected if not click on Edit followed by selecting the Require Demonstration Proof of Possession (DPoP) checkbox.
- Navigate back to the top of the page followed by selecting the Okta API Scopes option.
- Navigate down to the okta.groups.read option and click on the Grant hyperlink on the right hand side.
- Click on Admin roles at the top of the page followed by clicking on the Edit Assignments button.
- Click on the Role dropdown followed by clicking on Group Administrator and then click on the Edit link at the right-hand side.
- Search for a group you would like to add to this Application Integration followed by clicking on Add then Confirm once all your groups are selected.
- These Okta Groups are primarily used for creating users and assigning licenses to XQ products. They can also be added in order to restrict XQ policies (e.g. if only some users are able to access files outside the office, you could create an ‘allow’ policy that applied to just the users in the groups.
- These Okta Groups are primarily used for creating users and assigning licenses to XQ products. They can also be added in order to restrict XQ policies (e.g. if only some users are able to access files outside the office, you could create an ‘allow’ policy that applied to just the users in the groups.
- Finally, Save your changes.
Adding the Client ID and Okta Instance in your XQ Management Portal
- Navigate back to Applications>Applications> General on the left hand sidebar and copy the Client ID and paste this value back into your XQ Management Configure Remote Directory modal.
- Lastly, In the Okta portal also click on your profile in the top-right hand corner, hover over your Okta Instance id and click on copy to clipboard and paste this value in your XQ Management Configure Remote Directory modal in the Okta Instance input.
- Since you’ve already copied the JWK into your Okta App configuration, you can check the box and click Submit.
- Click on the Synchronize Now button followed by selecting which groups will have access to XQ as well as which groups you would like to provide licenses to.
- Additionally if you want to sync Policy Groups at the bottom of the page, in order to enable finer grained support for DA and DLP Policies, select the relevant groups and click Update.
